I had a poor soul who was hit by encryption malware. It appears that the person was infected at home, which encrypted files on that person’s DropBox account, which where then detected by SCCM Endpoint Protection on the company laptop.
To be safe, I wanted to make sure that the point of infection was in fact that home computer, and not a work laptop. However, I didn’t want to boot Windows, just in case.
Here’s what I did:
First I downloaded and booted copy of Ubuntu 14.04 LTS Live/Installation DVD.
Then I downloaded SCCM Endpoint Protection for Mac and Linux from the Microsoft Volume License Service Center.
(Hint: you won’t see the download separately in the product chooser. Choose the *entire* “System Center Endpoint Protection (current branch)” category, then it will appear as separate download)
The download will be an ISO containing the Mac and Linux clients as well as the documentation. I mounted the ISO and copied the relevant files to a flash drive (since the laptop DVD drive was in use from the Ubuntu Live DVD).
Copy scep.amd64.deb.bin (assuming you’re using 64-bit Ubuntu) from the Linux/[version] folder to the liveuser’s home directory. You will need to make the file executable by running:
chmod +x scep.amd64.deb.bin
Then extract the .deb file by running
./scep.amd64.deb.bin
and agreeing the license agreement.
Next, I had to futz around a bit with 32-bit compatibility. In the end, this did the trick:
sudo dpkg --add-architecture i386
sudo apt-get update
sudo apt-get install lib32z1 lib32ncurses5 lib32bz2-1.0
You can now (at last) install the Endpoint protection client by running
sudo dpkg -i scep-4.5.10.amd64.deb
Next came a quick configuration of the web interface.
sudo nano /etc/opt/microsoft/scep/scep.cfg
Edit the [wwwi] section.
Make sure you set
agent_enabled = yes
listen_addr = "0.0.0.0"
listen_port = port_of_your_choice (i used 8443)
username = "username_of_your_choice"
password = "password_of_your_choice"
Then restart the SCCM Endpoint Daemon
sudo /etc/init.d/scep restart
Make sure you’ve mounted the infected drive. It should appear in the left Launch bar as a hard drive icon. Click the icon to mount it.
Browse to https://localhost:8443 from that machine.
Log in with the username and password that you set in the configuration file.
Click “Control” in the top menu then “Update” in the left-hand menu. Click the “Update” button to update the definitions.
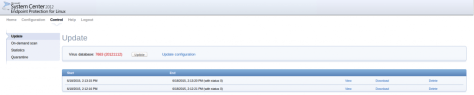 Wait until it has finished updating. You can check the status by clicking “View” for the appropriate entry on that page.
Once the update is finished, click “On-Demand Scan” on the left nav bar.
Choose “In-depth Scan” from the dropdown menu.
Under “Scan Targets” enter:
/media/ubuntu
Then click “Scan files”

This will scan mounted drives including the mounted Windows drive.
To view the progress, click “View” next to the newly created job entry.
That’s it, happy malware removing!
-Adam
 Click “Notification & actions”
 Finally turn off “Show me tips about Windows”
 Runtime Broker should immediately go back to normal.